Sketchup Blog - News and Notes from the Sketchup folks

Product Connect makes it easier to design with real products

Last April, our friends (and partners) at Igloo Studios released Product Connect for Google SketchUp to help designers document the product choices made in their SketchUp models. Today, I’m happy to report a new version of Product Connect is now available for download from the Igloo Studios website. This version makes it even easier to design with real products.

This video provides a nice overview of the new release:


The new version of Product Connect features thousands of product models and these three plugin-based tools:

Get Products

Use Get Products to browse nearly 300 collections of branded and generic products

Get Products is a new tool that makes it dead simple to add pre-existing product models from the Google 3D Warehouse. Like the Get Models tool in SketchUp currently, Get Products launches the Google 3D Warehouse but directs you to a collection with nearly 300 sub-collections of branded and generic product models. You can choose products from a Product Connect enabled catalog and you'll find that product information has already been added for you. Or, choose other Building Product models and add the information yourself.

Product Editor

Product Editor being used to specify a Delta faucet

With the new Product Editor tool, you can now create your own Product Connect enabled models. Just take any SketchUp component (including materials), launch Product Editor, and add any information you need such as product type, name and description. Product Editor can also be used to add or edit info in pre-existing Product Connect enabled models such as project specific notes or price.

Report Maker

Report Maker created product schedule, pasted into a LayOut presentation

When you’ve finished your design, and filled it with Product Connect enabled components, the new and improved Report Maker tool allows you to save organized product schedules in .csv format. With just a few clicks, product lists can be included in construction document sets, edited to create pricing estimates, and even used to place and manage orders.

If you have an existing collection of SketchUp components that you’d like to enable for Product Connect, Igloo Studios offers a service for upgrading existing components. Or if you don’t already have product models created, Igloo Studios can help you with that too. Contact them for more information

Thanks again to Igloo Studios for another great launch that will help SketchUp users everywhere streamline the product selection and specification process.

Posted by Gopal Shah, SketchUp marketing

Permalink | Links to this post | 2 comments

'Save a Copy As' is my new favorite command

Every time I talk to Mitchel Stangl, I learn something new. Mitchel’s a mechanical engineer who uses SketchUp Pro to build massively intricate models of processing and manufacturing facilities. On his last visit to SketchUp HQ, Mitchel helped me improve my workflow by telling me about the File > Save A Copy As… command (which we apparently added at his suggestion).

When I’m working on a big model in SketchUp, I like to save a new copy of my file every few hours. Doing so lets me easily go back to a previous version in case I’ve accidentally deleted something I need — this happens more often than I care to admit. It also provides a measure of protection against file corruption, which isn’t common, but can be devastating.

For the last eight years, I’ve been choosing File > Save As… and creating a numbered copy in the folder that contains my project. The result is a long, long list of sequentially numbered files. The most recent is the one with the highest number appended to the end, as you can see in the screenshot below. Simple, no?

Using File > Save As... to create a sequential archive of files is straightforward, but there's a more efficient way to work.

There are two problems with this system (as I’ve come to find out the hard way): First, when I come back to a project after a hiatus, I’m never 100% sure that I’m working on the latest version of my file. Maybe I saved a newer version somewhere else? Second, when I’m working on a set of drawings in LayOut, the linked SketchUp file always needs to be the most recent one. Every time I change the name of the SketchUp file (three or four times a day), I need to manually re-link the new model to my LayOut file. Yech.


If you periodically "Save As" your SketchUp model with a new version number, the workflow with LayOut is awkward. You'll spend a lot of time relinking your current model to your LayOut file.

Using the Save A Copy As… command (instead of Save As…) takes care of both these issues. It lets you save a version of your model as a new file without renaming the one you’re working on. The saved versions can be numbered and archived, but the “master” version is always called the same thing. There’s no confusion about which is the latest, and working with LayOut is twenty times easier. Presto.

Choosing Save A Copy As... allows you to save "snapshots" of your model while continuing to work on the same file. I like to keep an archive of old versions in a separate folder, just to keep things tidy.

I love it when answers to complicated problems are so simple. Thanks Mitchel!

Permalink | Links to this post | 18 comments

Mechanical design for everyone: SpaceClaim 3D Direct Modeling

SpaceClaim is a solid modeling application with a goal similar to SketchUp: make a 3D mechanical design tool so easy that anyone can use it. We helped the SpaceClaim team read and write SKP files years ago, but their latest release is a big step forward for engineers who are looking to use SketchUp in their workflow.

With SpaceClaim, engineers can convert conceptual designs in SketchUp’s native SKP format (which is optimized for fast performance) into precise solid models needed for mechanical design and manufacturing. As an example, SketchUp models usually convert to CAD programs as meshes, so holes end up being made of lots of little faces. SpaceClaim uses its feature recognition technology to convert these features into exact cylindrical surfaces.

Take the model below: SpaceClaim’s SketchUp import tools automatically convert facets to precise geometry when possible. On the left is the original SketchUp geometry. The middle model demonstrates the new import capability, with no manual cleanup. And the model on the right is further improved using SpaceClaim’s manual repair capabilities.

Moving from concept to production model with SpaceClaim for SketchUp

With this functionality, mechanical designers can directly re-use SKP files, rather than remodeling from scratch. This type of precision is important for rapid prototyping, laser cutting, CNC machining, detailed dimensioning, simulation, and photo-realistic rendering. And SpaceClaim’s process produces models that are completely compatible with other mechanical CAD systems. Another bonus: these import tools enable mechanical engineers to use the entire 3D Warehouse as a starting point for their designs.

If you'd like to try SpaceClaim, please visit their website.

Posted by Gopal Shah, SketchUp marketing

Permalink | Links to this post | 8 comments

SketchUp Pro Case Study: Alexander James International

We recently came across some marvelous work from Alexander James International (AJI), an interior design firm in the UK that specializes in the Hotel & Leisure market. Michael Reekie, Senior Interior Designer for AJI, was good enough to provide some insight into how they use SketchUp Pro.

I started using SketchUp Pro about five years ago. At that time we considered it a tool to help produce quick 3D line drawings of small areas. Gradually, its value has become more apparent and with the recent addition of Shaderlight, it is now considered to be an invaluable tool by the whole design team.

At the earliest stages of the design concept, I import a CAD plan of the project into SketchUp from which I build a model. It gives us a three dimensional awareness and makes space planning both easier and more accurate.

The SketchUp model offers better awareness of space which aids in the design and in space planning.

I continue to use SketchUp Pro throughout the design process, periodically using a fast, low resolution Shaderlight render to check the progress of lighting levels, features, furniture, and finishes.

SketchUp model with entourage and Shaderlight lighting elements, when rendered, will help validate the design, look and feel.

When I am sure that no other changes are necessary I produce a high resolution rendering which is imported into Photoshop. I can then make any small changes to colours or light levels and add people or anything else that I feel would enhance the final visual.

Final Render: SketchUp Pro + Shaderlight + Photoshop

Before using SketchUp I produced hand-rendered visuals. The uncomplicated nature of the program has made the transition easy and very effective. SketchUp has become an invaluable tool for the whole design team.

A big thanks to Michael Reekie (michael@aji.co.uk) and the whole AJI team for providing this snapshot into their SketchUp workflow. Great work!

Permalink | Links to this post | 12 comments

Modeling cultural heritage sites with SketchUp Pro

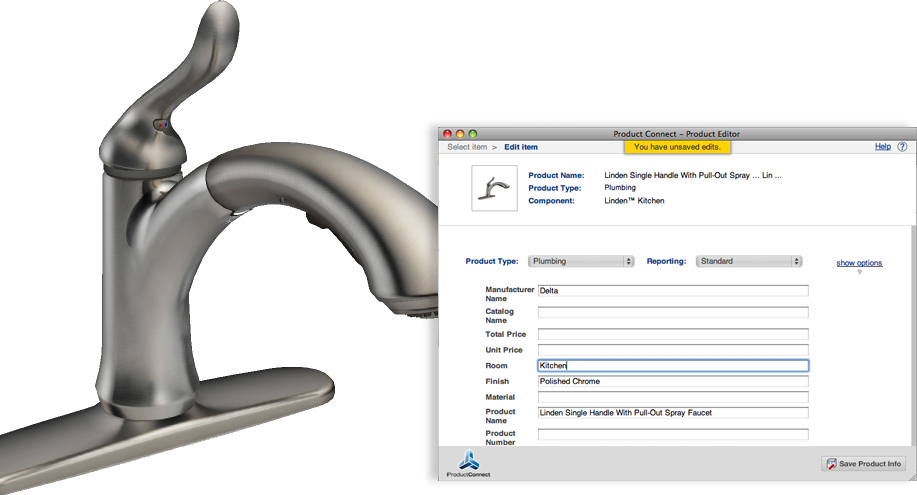
CyArk is a non-profit organization dedicated to digitally preserving cultural heritage sites. They do this by collecting, archiving, and providing open access to data created by laser scanning, digital modeling, and other state-of-the-art technologies. CyArk is also one of the many recipients of SketchUp Pro licenses as part of our SketchUp for Nonprofits program. This case study came to us from Justin Barton, a Technical Services Manager at CyArk.

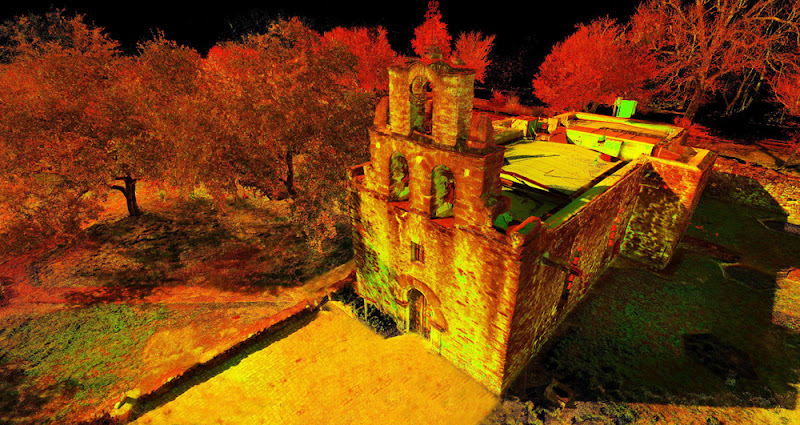
A perspective view of 3D laser scan data (terrestrial LiDAR imagery) of Mission San Francisco de la Espada, San Antonio, Texas.

As part of the ongoing effort to educate the general public and disseminate information in an interactive environment, CyArk uses millimetrically precise data from heritage sites captured with 3D laser scanners to model the sites in SketchUp Pro. In order to do this, we use two methods:

Method 1: Orthorectified imagery

Our 3D laser scan processing software allows us to export orthorectified images of the data. We begin by exporting a plan of the structure to build a basic block model from. The plan is brought into SketchUp Pro, scaled, geo-located (all of our scan data is geo-located with GPS), and then the model is created from the accurate plan data.

Using orthorectified imagery created from laser scan data to trace out the model in SketchUp Pro.

After we create the block model, we import orthorectified elevation views of the structure. We then trace the outline of the building and “push out” the unwanted parts to create the unique architectural shape. The elevation view is also used to overlay the photo-real texture information.

Method 2: Direct modeling from 3D scan data

We are also able to use the Pointools plugin for SketchUp that allows us to load the 3D laser scan data point cloud directly into SketchUp. This allows even more precise modeling directly over the data. Again, orthorectified images of facades are used to overlay texture information.

A 3D laser scan data point cloud, brought into SketchUp Pro using the Pointools plugin. (Note: This image has been altered to improve visualization of the process.)

After modeling is complete, visitors to the CyArk website and projects interact with them in two ways: CyArk has an online, Java-based web app that allows users to view 3D point clouds directly, or view solid models such as those created in SketchUp Pro or other 3D meshing software.

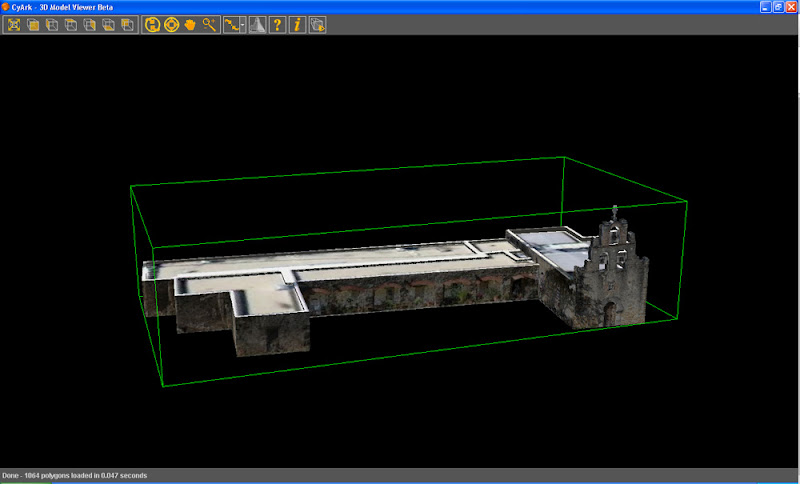
3D model of Mission San Juan Capistrano, San Antonio, Texas created in SketchUp and viewed in CyArk’s free online 3D Viewer.

The other way that users can interact with 3D models on CyArk’s website is by using the Google Earth plugin, which we’ve integrated into a web page on the site. This provides a navigable 3D environment in which users can see geo-located SketchUp models while interacting and viewing geo-located multimedia items such as architectural CAD drawings, videos, 360-degree panoramic images, photographs, historic imagery and more.

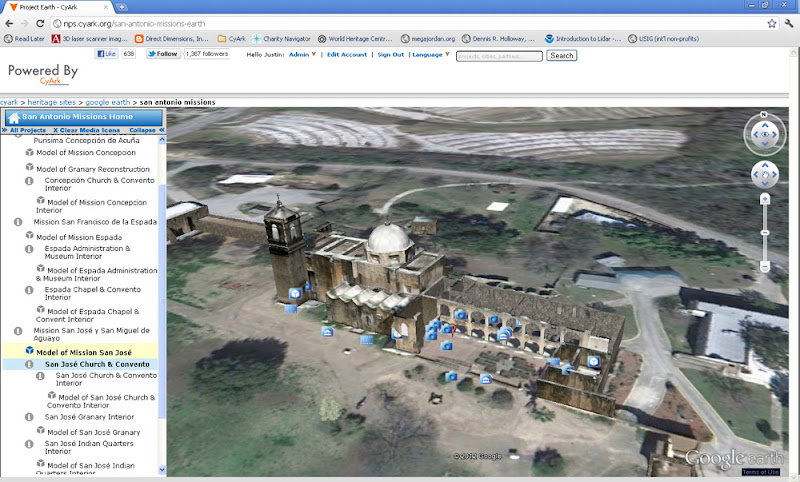
A 3D model of Mission San Jose y San Miguel de Aguayo, San Antonio, Texas created in SketchUp and viewed in Google Earth on the CyArk website. Multimedia items (architectural drawings, videos, panos, historic images, etc.) are geolocated on the Google Earth interface and represented as a variety of type-specific icons that surround the model.

In addition to modeling directly from accurate 3D survey information (as seen here in the San Antonio Missions project and associated iOS mobile app), CyArk and our partners have taken advantage of SketchUp Pro’s easy modeling platform to create historic reconstructions of sites and site features that no longer exist. For example, for a project with Fort Laramie National Historic Site, eight historic reconstructions were created in SketchUp. Users visiting the Google Earth map of the project can choose to see the Fort as it appeared in seven different time phases, as well as a detailed reconstruction of the Post Hospital. All were created from extensive research, historic photographs/sketches, consultation with park experts, and metrically accurate laser scan data of structures, standing ruins, and remaining foundations as the base for the models.

SketchUp Pro provides CyArk the tools to quickly and accurately model historic sites to create interactive 3D environments for members of the public, educators, students and researchers to access online. This aids us in fulfilling a significant part of our mission to share, disseminate and educate.

Thanks for sharing this story, Justin. If you’re interested in getting involved with CyArk, you can find out more about volunteering, becoming a partner or donating to CyArk on the Get Involved web page.

Permalink | Links to this post | 2 comments