Sketchup Blog - News and Notes from the Sketchup folks

Farewell, Blogger

If you’re reading this, you’re officially missing out on new posts at the SketchUpdate blog’s new home: blog.sketchup.com.

Since 2007, the SketchUpdate blog has been using Google’s Blogger platform for publishing articles about SketchUp. It’s been almost three years since we’ve moved on from Google, so we figured it was about time to bring the blog over to our own website.

For the next few weeks (while our new blog is in beta), you’ll still be able to read posts here on Blogger. Pretty soon, though, we’ll be redirecting these articles to our new blog.

We’ve moved the majority of SketchUpdate posts to the new site, but not all of them. Over the years, we’ve had lots of posts about Google Earth and Building Maker, two products that are no longer part of the SketchUp family. While you won’t find posts about those products on the new blog, you can look forward to many new articles about SketchUp tutorials, 3D Warehouse content, extensions, developer tools, and a lot more. Thanks for reading and sketching with us all these years -- come on over to the new SketchUpdate blog to keep on scrolling!


Posted by Mark Harrison, SketchUp team

Permalink | Links to this post | 7 comments

SketchUp gets extreme with skatepark designer Dug Ketterman

Dug Ketterman is a world renowned skatepark designer with an impressive resume of projects under his belt, including multiple X Games courses. Dug is an active member of the SketchUp community, and we spoke with him recently to learn more about his insane collection of skatepark and ramp designs. He also shared some modeling advice, so even if skateparks aren’t your thing, we still think you’ll take away some rad SketchUp tips.

4.jpg
The 2012 X Games Street Course designed in SketchUp Pro

How long have you been using SketchUp?
Before SketchUp, I had spent years and countless hours drafting skateparks and ramps by hand. My dad uses SketchUp for woodworking and suggested I give it a try. This was back in 2006 and I’ve been using it ever since. The speed and no-nonsense way of modeling had me hooked. I’m attending the Art Institute of Portland for my bachelor’s in Industrial Design and have tried several big name 3D modeling softwares, but SketchUp seems to be the only one that works with my brain.


What is important in skatepark design?
There are many things that go into a good design, all of which cater to different types of skaters. Some enjoy transitions like pools and halfpipes, while others skate on flat-ground and never touch transition. However, the one thing that all skaters can agree on is flow. You need to be able to generate enough speed to take you from one feature to the next with a minimal amount of pushing and without running into other obstacles. As I am creating parks, I am constantly thinking about distances, heights, gaps, angles and materials to determine proper spacing within a given boundary. I refer to this process as 'Flow Analysis': the study of spatial relationships between skatepark elements.

3.jpg
The 2013 Global X Games Street Course held in Munich, Germany is one of the riders’ favorite courses to date. They all thought it had great flow. Co-designers: Brian Harper & Ryan Johnson

How does being a skateboarder and an architect influence your park design in comparison to an architect who doesn’t skateboard?
There is something commonly referred to as ‘the contractor's kink.’ This refers to the worst placement of seams and uneven skating surfaces that general contractors and architects unknowingly design into skateparks. There are many nuances to creating a well-skating park. This knowledge can only be gained through experience skating a wide variety of terrain. Rail heights, ledge angles, grind edge materials, seam and joint placement: these are just a few of the things that can make or break a perfect skate spot.

Contractor's Kink Example.jpg
A perfect example of ‘contractor’s kink.’ No space for speed, a large seam in the concrete, and a handrail that’s too high. Photo courtesy of thrashermagazine.com

Out of all of 'em, what has been your favorite project?
It has to be the 2011 X Games Street Course held in Los Angeles, CA. I had free reign not only to design the park, but also to be on site to finalize every exacting detail, right down to the grass coming out of the faux cracks and the authentic graffiti tags decorating the brick walls. It was exhilarating working as an art director with a crew of 20+ talented concrete, wood, and steel workers to help realize a 10,000 square-foot sculpture that was about to be skated by the world’s best athletes on live television in front of millions of viewers.

X Games 2011 Street Render.jpg
The 2011 X Games Street Course designed in SketchUp Pro

XG 2011 Street.jpg
Photograph of the nearly completed 2011 X Games Street Course


What are your go-to SketchUp extensions?
The Super Section plug-in has saved me tons of steps when creating construction documents. It's a genius extension for creating layers and scenes in LayOut. Also, Bitmap to Mesh and Sandbox Tools are great extensions for creating mesh surfaces.

How do you organize your models?
Groups and components are king. I treat every element in my model as if it were a separate material in the real world: plywood, 2x4's, scaffolding, etc. Grouping each piece separately allows you to quickly scale and resize as you draw and make modifications. Components are great for updating multiples of the same object in your model all at once. And nesting of groups and components allows you to create layers and scenes with quickness and ease. This, in combination with layers, helps hide parts of the design to keep things lightweight while modeling, and make it easy to view specific elements.

What advice would you give to new and aspiring SketchUp users?
Groups, Groups, Groups. This simple habit will save you from having sticky blob models that are filled with line fragments and impossible-to-edit geometry. I would also suggest starting with basic objects around the house and drawing them with as much detail as possible. This will bring about new challenges and force you outside of your comfort zone.


Posted by Stephen Grant, SketchUp team

Permalink | Links to this post | 2 comments

New 3D Warehouse User Profiles — Because YOU Matter Most

We are so excited to announce brand new, more robust, user profiles for 3D Warehouse. We hope you’ll find that the revamped My 3D Warehouse page provides the features you need for promoting yourself, your interests and your business as well as improve your ability to connect with other users.

To get started, you’ll first need to Sign In to 3D Warehouse. Then choose “My 3D Warehouse” from the User drop-down menu (see Fig. 1).


Fig 1. Once you've signed in, choose My 3D Warehouse from the User menu.


Your My 3D Warehouse page shows the information that is visible to other 3D Warehouse users. To edit your profile, click the button labeled “Edit Profile” (see Fig 2).

Fig 2. Click Edit Profile to modify the profile information that is visible to other 3D Warehouse users.


Profile Info
Filling out profile info like your user profile photo (Fig. 3-A), bio (Fig 3-E), web links (Fig. 3-F), links to your social accounts (Fig. 3-G), location (Fig. 3-H) and Profesional Info (Fig. 3-I) can be a great way to let folks know more about who you are and gives you the ability to promote yourself and/or your business. You’re free to fill in as much or as little information as you want — and select privacy controls (Fig. 3-D) for setting which fields are displayed on your public profile.

Custom URLs
Another noteworthy feature included in this release is the ability to claim a custom URL (Fig. 3-B), such as: http://3dwarehouse.sketchup.com/by/SketchUp. Custom URLs have to be unique, so hustle up and grab yours before someone else does!

Contact Me
This release also reintroduces a feature that gives you the option to allow other 3D Warehouse users to contact you directly via the email address associated with your 3D Warehouse account. To take advantage of this feature, you’ll need to be sure to opt in by checking the checkbox (Fig 3-C). For more information about the Contact Me feature, please feel free to check out this Knowledge Center article.

Fig 3. The new 3D Warehouse User Profiles are chock full of ways for you to share info about who you are and why you're passionate about 3D modeling.


We know you work hard on your models! By sharing more information on your profile, you are now able to connect with and more meaningfully engage your fellow 3D Warehouse compatriots. So go ahead and upload that selfie or logo, tell us about yourself, and get social! We hope you have as much fun using these new profile features as we had making them.

Questions, comments? Feel free to visit our Community Forums.


Posted by Mike Tadros (Product Manager) and Alexandra Bowen (Community Manager)

Permalink | Links to this post | 2 comments

3D Warehouse Comments are back!

Commenting is the backbone of the Community — it’s a communication channel that gives 3D Warehouse users the ability to support and learn from one another. We feel a bit crummy that 3D Warehousers have been without commenting for a while, but we’re immensely proud of our new and improved system. Our sincere thanks to those of you who were patient enough to stick with us. It was really important to us to get this right, and we hope that what we’ve delivered was worth the wait.


Fig 1. We #BroughtBackComments — replies are now threaded to help make sense of side conversations.


Before you dive in, here are some things you might want to know about 3D Warehouse’s Commenting features:

• We’ve migrated all the legacy comments from our old commenting system.
• You’ll need to be signed in order to use commenting features.
• Comments and replies are now threaded to help make sense of side conversations.
• You can add a new comment, reply to an existing one, and even edit or delete your own comments.
• You’ll notice a flag icon alongside all comments. If you find that a comment is offensive or abusive, (as shown in Fig. 2) click the Flag icon to alert our community moderators. Flagged comments will automatically appear in the state shown in Fig. 3 below until they’re reviewed:

Fig 2. Click the flag icon to mark a comment as abusive.


Fig 3. This is what a comment will look like once it's been flagged.


• Comments are enabled for every model by default. If you’d prefer, you can easily disable commenting for any of your models while in Edit mode on the model details page (see Fig. 4):

Fig 4. You can enable or disable comments for any of the models you've published on 3D Warehouse.


• Lastly, we’ve introduced a notifications feature that will help you stay up to date on conversations. You can manage notification preferences on the new Edit Profile page (see Fig. 5).


Fig 5. You can now receive email notifications when other users comment on your models, or reply to your comments.


Now, more than ever, we’ve made it possible for you to connect with professionals and hobbyists of all sorts. We invite you to start a conversation with other 3D Warehouse community members who have shared their great modeling work for all to see and use.

Of course, comment threads usually benefit from a degree of decorum. We hope you’ll engage in discussions that make 3D Warehouse an interesting and helpful place — and avoid those conversations that do not. So go ahead: give props, make suggestions, ponder polycounts or the future of the universe. 3D Warehouse comments are back, and we’re excited for the conversation to begin, again.

Questions, comments? Feel free to visit our Community Forums.

Happy commenting!


Posted by Mike Tadros (Product Manager) and Alexandra Bowen (Community Manager)

Permalink | Links to this post | 1 comments

Smart modeling for building performance using SketchUp and Sefaira

A few members of the SketchUp team recently traveled to New York to spend a little time with the folks at Sefaira. Sefaira provides energy and daylighting analysis to help architects and designers drive decisions like form, orientation, and facade design with the aid of real-time feedback in SketchUp.

Together, we worked on a webinar called Smart Modeling for Building Performance. The focus of the webinar was to take a closer look at some of the decisions that drive building performance, as well as some SketchUp techniques that aid in this kind of modeling at early stages of design.


Check out the recorded version of the webinar from Feb. 19, 2015. The techniques shown in this video are aimed toward the use of SketchUp with the Sefaira extension.


We also put together a list of resources and answers to questions that were presented during the webinar. You can access those here and find more information about Sefaira on their website or on the Extension Warehouse.


Posted by Josh Reilly, SketchUp Team

Permalink | Links to this post | 1 comments

SketchUp Skill Builders: Model Smarter, Faster

Have you ever had that moment in SketchUp where you discovered something new and your entire day got a little brighter? We created a new video series that’ll hopefully add more of those moments to your month. Our new SketchUp Skill Builder videos are meant to be short (just a few minutes), so you can grab some morning coffee and learn something new in a few sips!


SketchUp Skill Builders: Learn something fun and useful about SketchUp in just a few minutes!


As we release these videos, we’ll also create separate discussion threads for each video in the Tutorials category of our SketchUp Forum. That’s the place to go if you have questions about a technique, or an idea about how to model even smarter.

We’re planning to release a few Skill Builders each month, and we’d love to hear what techniques you’d like to learn more about or any of your own modeling tips you’d like to share with the SketchUp community. Fill out this form to suggest an idea for a future Skill Builder video.


Posted by Josh Reilly, SketchUp Team

What? You’ve never been to the SketchUp YouTube channel? We have lots of useful videos about modeling techniques, tools, and user stories. Search within our channel or subscribe to stay in the loop on our latest and greatest.

Permalink | Links to this post | 6 comments

Ready, set... Maker Bench

Screen Shot 2015-02-23 at 12.39.41 PM.png
Maker Bench is going to be an open source, CNC workbench for everyone. Sounds fun, right? Well, then, help us design a Maker Bench!

At SketchUp HQ, we spend a lot of time thinking about how SketchUp works, and trying to make it work much or even just a bit better. Over the years, we’ve found that SketchUp users think a lot about how SketchUp works too.

This got us thinking: It’s fun to think about how something works, especially when that something is used to make other somethings. We call this circular design task meta-making -- making the things that people use for making.

So, we thought it would be great to spin up a new meta-making project with the SketchUp and maker communities: it’s called Maker Bench, and it’s a CNC workbench for everyone.

(What’s that? You’re ready to start designing your own maker bench now? Jump into the SketchUp Forums to get going. Otherwise, read on!).

Along with Eric Schimelpfenig at SketchThis.net, we’ve been kicking the idea of a Maker Bench around for a few years now. In that time, we’ve built WikiHouses, Open Desks, geodomes, modirondack chairs, skpr bots, and lots of other things too. As part-time makers, we always seem to find ourselves retrofitting work spaces, jigs, and tools in new environments. What if it were really, really easy to design and build our own workspace, and then bring it with us?

Last year, we came across Ron Paulk’s phenomenal workbench. We were impressed (not to mention full of desire), and we wondered what Ron’s project would look like if designed for makers, not professional carpenters.

06a6376a8d93cf3f.jpg
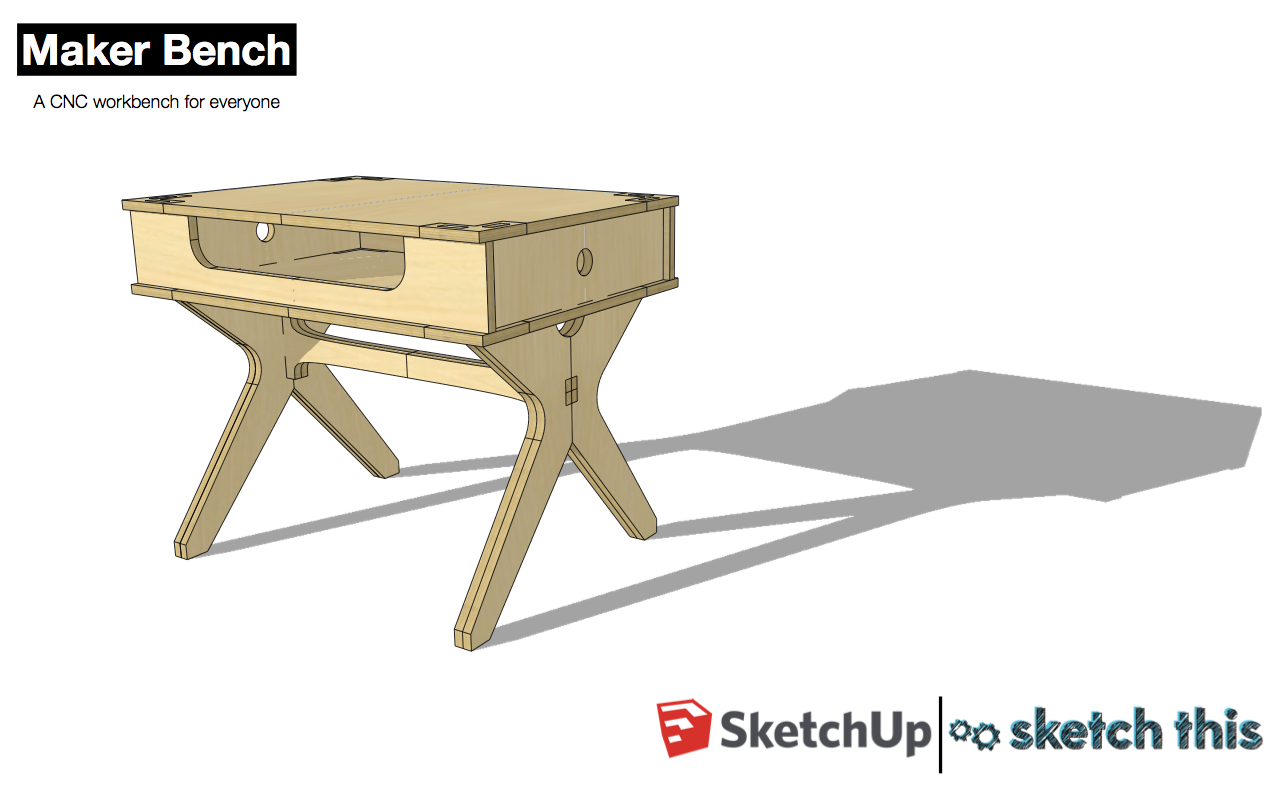
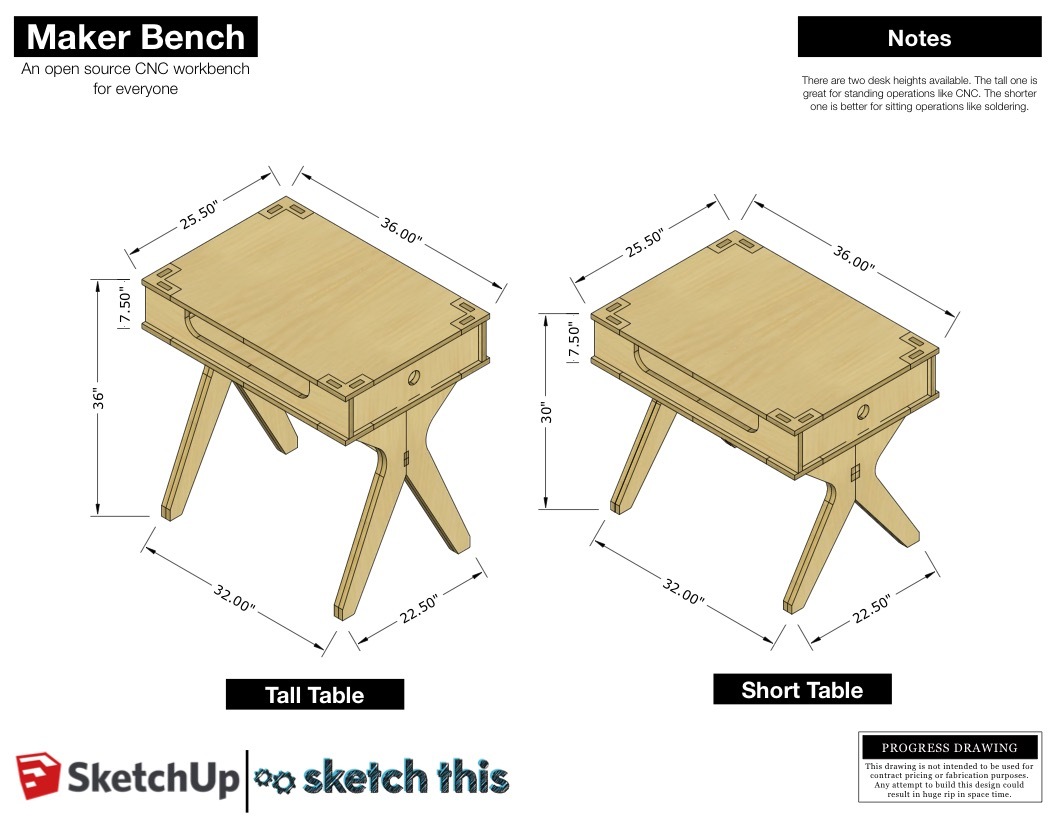
Maker Bench: standing or sitting? You decide!

Our curiosity with this idea came to a point this past December, and we started asking ourselves, “what do makers need in a work bench?” Well, here are a few starting ideas:

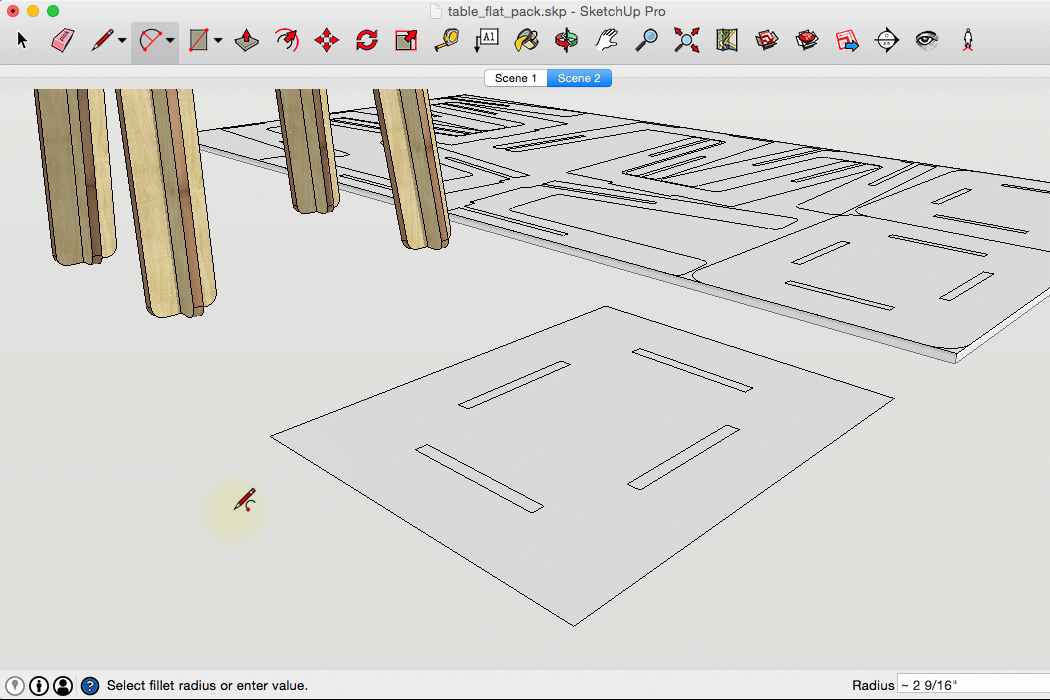
Accessibility: A Maker Bench should be accessible to anyone who makes anything. That means it should be simple to construct and be fabricatable using tools that are commonly accessible at a makerspace or TechShop. Further, Maker Benches should require an economical amount of material and minimal hardware.

Portability: A Maker Bench should fit easily in your car.

Storability: Maker Benches should work well in environments where there may not be a lot of space (a garage, a worksite, a shop, or a makerspace). Ideally, it should be easy to break down and store one or many Benches.

Modularity: People have different workspace requirements or constraints. Maker Benches should be modular so that you have control over how much space you need.

Retrofittability’: Along with modularity for dimensional workspace, a Maker Bench should be modular enough to accommodate specialized use cases. A few that came to mind right away were drawing, CNC work, soldering, and 3D printing.

d9c25f99b50869c1.jpg
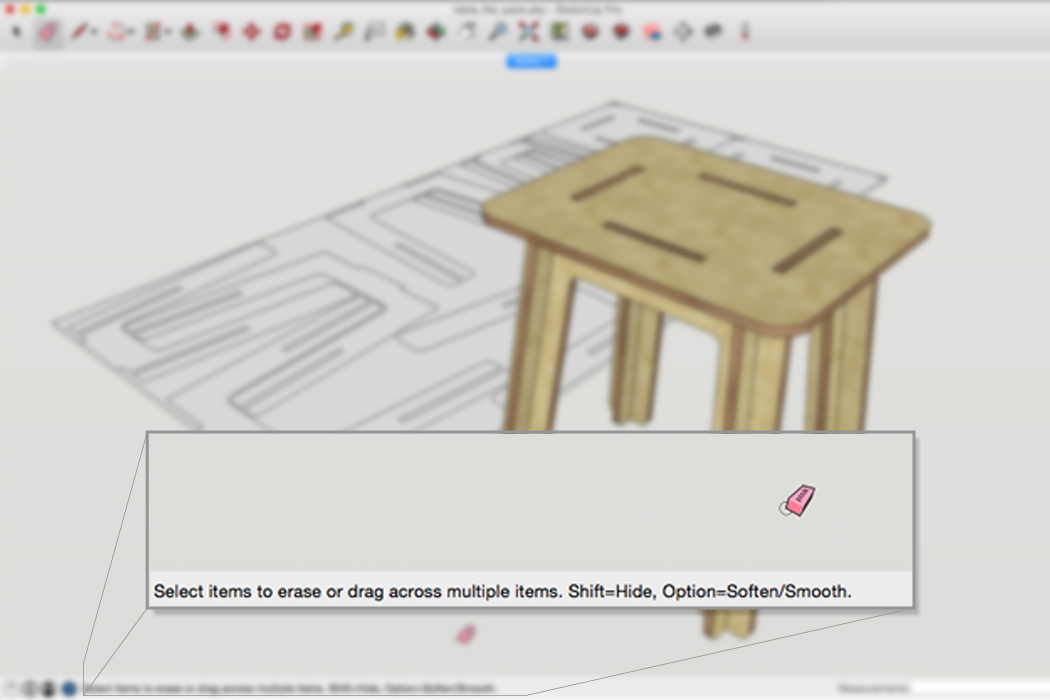
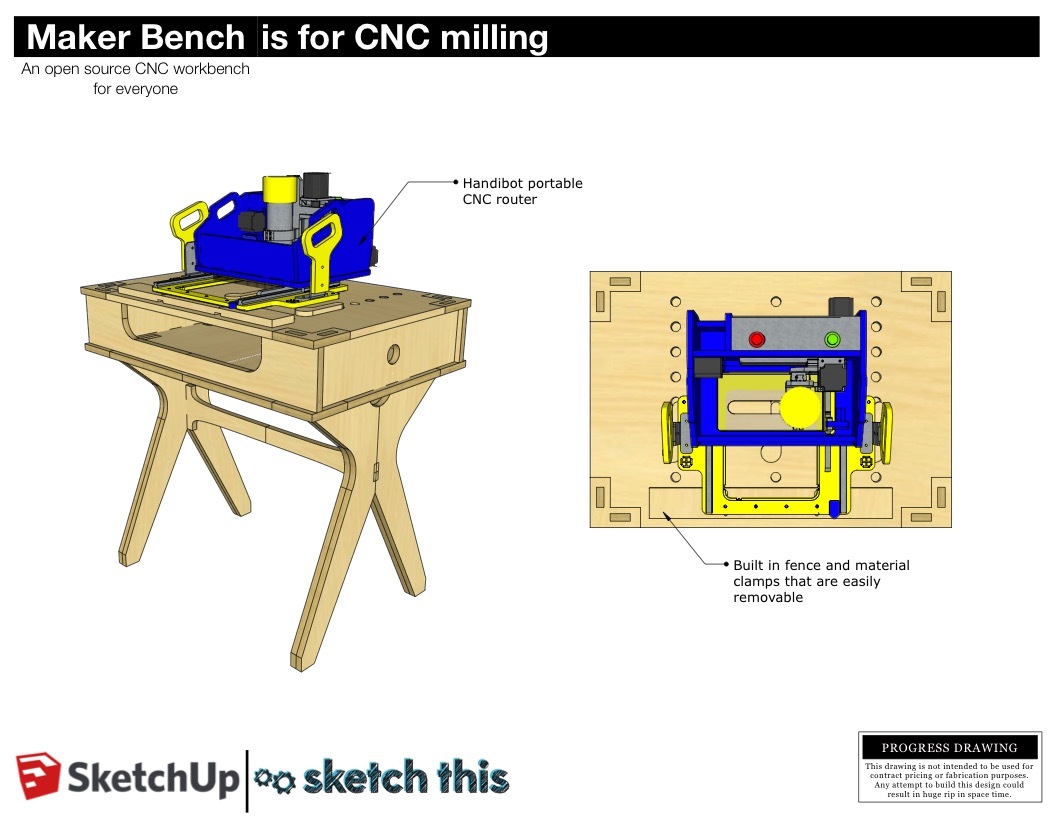
The top of each Maker Bench is removable and customizable. We’ve designed this one for use with ShopBot’s Handibot.

As we mentioned before, we’re only part-time makers, so another requirement for the project is that the designs for Maker Bench should be open for anyone to customize.

With that in mind, our first major step in actually making a Maker Bench is to ask you for help. What should a Maker Bench look like? What else should it be able to do (or help people do)? How can we make it better?

Jump into the SketchUp forums, and join our Maker Bench conversation. Tell us what you want to see in a Maker Bench. Better yet, download the starter-models and start tinkering. We hope to spend the next two months modifying the design, and then fabricate our first set of prototypes at Maker Faire Bay Area in May.

Along the way, we’ll share our conceptual and as-built models, our good ideas, our bad ideas, our cutting files, and our build photos. Please, join us! We’re aiming to meta-make a workspace that’s practical and useful for people who tinker and build, and we’re planning to have some fun while we’re at it.


Permalink | Links to this post | 14 comments

SketchUp Multi-Tool Personalities: Part One

Did you know that many SketchUp tools have alter egos? You might think you know your SketchUp tools pretty well, but many have supplemental functions revealed in the status bar at the bottom of the SketchUp window that most folks don’t notice.

flat_pack-02-01.jpg
What’s that? The Eraser tool leads a secret life as a quick way to hide or soften/smooth geometry!
Keep an eye on the status bar for other modifications on standard tools.

The information in this status bar changes when different tools are selected. For example, when the Eraser tool is selected, you’ll see two key modifier hints in the status bar: hold Shift to hide edges instead of erasing them, or hold Option (Ctrl on PC) to Soften/Smooth edges. All of sudden, one tool gives you access to three.

However, there are a handful of tool abilities that are not communicated via the SketchUp interface. If you didn’t know about these extra options – it’s kind of like finding a $20 bill at the bottom of your drier. Take a look at the Arc tool, for instance. There’s a useful hidden feature here that was introduced in SketchUp 2015: you can automatically trim corners with the Arc tool by double-clicking immediately after drawing an arc. Here’s how:

  1. Select the Arc tool and click on one edge of a corner to start drawing an arc.

  2. Hover your cursor over to the adjacent edge; notice the “Tangent to Edge” indicator that appears.

  3. As you continue to hover along the edge, look carefully for the arc to change color from cyan to magenta. The magenta color indicates that you’ve located the point that is equidistant from the corner relative to your initial point (arc is tangent at both edges).

  4. Double-click when you see the arc change to magenta and SketchUp will automatically trim that corner.

  5. If you’d like to continue trimming corners at that same radius – simply double-click near other corners. Need a visual? Check out the animation of this in action below.

Automatically trim corners by drawing a tangent arc at a corner and then double-clicking with the Arc tool. Check out this Knowledge Center article for additional information about these methods.


Now let’s explore the Position Camera tool. It may not be used often, but it’s worth taking out of your tool belt once in a while. If desired, you can review this tool in our SketchUp Training Series: Position Camera / Look Around video. When you’re ready, try this in your current SketchUp model:

  1. Select the Position Camera tool; notice status bar informing you to “Select the camera position.”

  2. Click once on a point in your model where you wish to set the camera position.

  3. SketchUp zooms into the viewpoint you chose. The status bar now states, “Drag in direction to turn camera.” Note that your cursor now changes to the icon for the Look Around tool. This allows you to adjust your view as if you’re turning your head; the camera position is stationary, but you can swivel to look around.

  4. In Step 2, we clicked and released the mouse button. If you click and drag, the status bar indicates: “Select a point that the camera is aimed at.” You can now release the mouse button over a location in your model where you wish to look. One use of this is to perform a line-of-sight analysis where you want the vantage point from a specific location and the view aimed at a specific point in your model.

Position Camera lets you pick a vantage point in SketchUp and create a view looking towards a specific location in your model. (Models shown found via 3D Warehouse: Star Trek TOS Crew, USS Enterprise NCC- 1701- G, & 40 Acres "Mayberry" Sets)


We’re sure you’ve noticed that SketchUp will snap to specific inferences as you draw with certain tools. The Arc tool snaps to a half circle proportion. The Rectangle tool snaps to square proportions as well as the Golden Section (Golden Ratio). A dotted line with a Golden Section tool tip will appear when you’re in a position to create a Golden Section. Try this for yourself by clicking once to start drawing a rectangle – hover slowly – and look for SketchUp to snap to those proportions.

Looking for Golden Section proportions? Utilize the Golden Section snap in SketchUp to quickly draw with these proportions.

If you’re curious about what else you may have never noticed about your favorite SketchUp tools, here’s a list of some key modifiers you can find among the tools in the Large Tool Set:

Select → Shift = extend selection
Eraser → Shift = Hide, Option (Ctrl) = Soften/Smooth
Push/Pull → Option (Ctrl) = create new starting face
Move/Copy → Option (Ctrl) = copy, Shift = lock inference,
Command (Alt) = auto-fold
Rotate → Option (Ctrl) = copy, Shift = align to face
Tape Measure → Option (Ctrl) = create guides
Protractor → Option (Ctrl) = create guides, Shift = align to face
Orbit → Shift = pan, Option (Ctrl) = suspend gravity
Zoom → Shift = change field of view
Walk → Option (Ctrl) = run (seriously!), Shift = move vertically or sideways,
Command (Alt) = disable collision detection
Section Plane → Shift = lock to plane

It’s easy to miss some tool options and key modifiers when you’re cruising along in SketchUp. Don’t forget to occasionally peek at that status bar while you’re modeling; it might just give you the hint you need to proceed.


Posted by Josh Reilly, SketchUp Team

Permalink | Links to this post | 2 comments

Taking a ride with Connor Wood Bicycles

Yup, you read it correct: Chris Connor makes bicycles out of wood. We did a double-take too when we met Chris at the 2013 AIA National Convention in Denver. At first, we weren’t sure why a bicycle builder was exhibiting at an architecture trade show, but without a doubt Chris’s ridable wooden bikes share the functional beauty of a well-designed building.

After having logged many hours designing the base geometry of his custom bikes with paper and pencil, Chris turned to SketchUp to streamline his design process. We visited his workshop in Denver to learn more about how he creates these timber two-wheelers.


Permalink | Links to this post | 0 comments

Introducing 3D Warehouse Detailed Collections

Remember Component Bonus Packs? 2D and 3D trees, furniture and accessories, wood joists and roof details: these components, authored by the SketchUp team, have been a consistent staple of 3D Warehouse for years. With the release of SketchUp 2015, we’ve greatly expanded and improved SketchUp’s standard component collections.

As of today, more than 2,800 individual detailed pieces of new SketchUp-authored content are available on 3D Warehouse. As you browse the new Detailed Collections, you’ll find that many standard components, like this theater light, have been improved with a much greater level of detail.

Find more Film and Stage models here.


Similar to their predecessors, the updated and improved components are generic in nature. These new, detailed components have been uploaded alongside the simplified counterparts; the titles of new components end with “Detailed.” For example, the search result for “HMI Light 4000Watts with Barndoors” will display both the simplified and detailed versions of the component. It’s important to note that these new detailed components are typically more “geometry heavy” (a.k.a. higher polygon count), which means you should consider how they’re used in your SketchUp model. You may consider using simplified components as proxies and replace those with the detailed versions when appropriate (just take note of component insertion points).


description here

description here

description here

description here
Several side-by-side examples of the simplified generic content vs. their detailed counterparts.
(Note: 2D Crocodile Hunter tribute model, by 3D Warehouse user jw_n_mo, not actually included in detailed glass door component.)


You can access this treasure trove of content by browsing 3D Warehouse Detailed Collections via SketchUp’s 3D Warehouse window (File > 3D Warehouse > Get Models) or via your web browser. You can find all components and collections created by the SketchUp team by visiting our 3D Warehouse profile.

In addition to visual improvements, these components are also jam-packed with all sorts of useful information, including IFC attributes. Try exporting to Tekla BIMsight or Trimble Connect – both accept IFC files. You’ll see that the IFC metadata transfers too!

Detailed version of a 2 inch ball valve showing IFC classification data in the Entity Info box.


The release of this content provides a great excuse to browse 3D Warehouse in search of new components to include in your projects. We’ve taken special care to include relevant tags in each component so users can search and find exactly what they need. There are collections for Seating, Electronics, Jibs and Cranes... and many more! We hope you’re able to take advantage of this new content and that it helps you more quickly and more accurately express your ideas.

Keep tabs on recent activity by following 3D Warehouse on Twitter, Facebook, or Google+


Posted by Ryan Ghere, SketchUp Team

Permalink | Links to this post | 8 comments